wordpress social integration documentation
Wordpress social integration is a complete social integration package - provides login by facebook using ajax(FB login button along with login form anywhere by shortcode), adds opengraph, twitter cards metadata including basic description and keywords meta tags, displays your facebook home page news feed, and let you use facebook social plugins(like button, comments..) anywhere in page using shortcodes.
Login by facebook
Facebook login button along with login form are shown anywhere in page using shortcode, First time user can connect their facebook account with existing account or creating new account to login next time on
one click, everything is done using ajax, there are settings to show/hide login form parts.
1. To make login work facebook application must be created, follow "how to create facebook application" section at the bottom of this page.
2. Place that application id in setting page in admin dashboard and save your plugin settings.
When user first time clicks login by facebook button, he is authenticated by facebook & facebook asks some permissions to be granted your FB application, then
a popup page is shown where user can login with his existing account to connect his account with facebook account or create a
new account to connect with facebook. If this complete, next time he can login by facebook on one click.
Make sure you always use one facebook application for login by FB because from FB Api version 2.0, user id is different per FB application. to make
things proper your that app scoped user id is stored and matched to make login instead variable email, name. Although FB never deletes any app unless severe
reasons, don't use your that app to do FB developments improperly.
-----------------------------------------------------------------------------------------------------------------------------
Open graph, twitter card, basic meta tags
Open Graph meta tags are required to describe your page to facebook, twitter and other social media. By WSI plugin you can easily add title, description, image,
and other information which are shown anywhere in facebook when your page is liked, shared, or commented on. This ensures your branding and social presence
& it is must needed to present your content efficiently across social medias like FB, twitter, google+...It also adds twitter meta tags separately(you need to enable twitter
cards for your website in twitter.com to display these content).It also adds basic metadata(description, keywords..). Provides efficient, out-of-the-box search engine optimization (SEO) on a web site powered by WordPress.
It adds metadata in the following ways -
* plugin injects metadata tab at the bottom of any post edit page admin side so that you can set title, description, keywords, full meta tags, news keywords meta tags for the post
* you can set front page description and keywords from setting page which will be added in different types of front page meta tags
* Automatic addition of the blog's tagline in the description metatag, automatic addition of the blog's categories in the keywords metatag.
* Automatic addition of an auto-generated excerpt of the post's or page's content in the description meta tag. If a post has a user-defined excerpt, then this is what is used.
* Also there are different ways to set description and keywords meta tag data from different data source for other pages like Attachments, custom post types, Category-based Archives , tag-based Archives, Author-based Archives
* It injects all these metadata for all kinds of pages - single post/page, static front page, default front page, static home page, author page, attachment page etc.
* It adds required FB & twitter username/profile url input box per user so that those user relaed open graph & twitter card metadata are added when available
* It's possible to add site-wide meta tags from setting and post edit page in admin side so that you never miss any metadata
* You can add news keywords too, some other required meta tags are added automatically
* It generates detailed metadata for the media that have been attached to the content. Considers all the media you manage in the WordPress media library.
WSI allows filtering of the generated metatags and also of some core functionality through filters. This way advanced customization of the plugin is possible.
The available filters are:
1. wp_scintg_metadata_head - applied to all metatags that have been generated by WSI. The hooked function should accept and return one argument - an array of meta tags
2. wp_scintg_basic_metadata_head - applied to the basic metatags (description, keywords, etc) which were generated by WSI
3. wp_scintg_opengraph_metadata_head - applied to the OpenGraph metatags that have been generated by WSI
4. wp_scintg_twitter_cards_metadata_head - applied to the twitter cards metatags that have been generated by WSI
You can see if open graph meta tags injected right or not and how it look like by submitting and checking any of your page url here - https://developers.facebook.com/tools/debug/
-----------------------------------------------------------------------------------------------------------------------------
You can add facebook social plugins like like button, comments, share button, follow button, send button, embed any FB post by putting WSI social shortcodes with different parameters as follows anywhere in post, page, widget, templates....
WSI like button shortcode parameters
Example: [wp_social_integration_like_button] or [wp_social_integration_like_button href="https://developers.facebook.com/docs/plugins/" width="300" layout="standard" share="true" ]
| Parameter | Options | Detail |
|---|---|---|
| href | text | any url or fb page url or empty for current page to like |
| width | numbers | the width in pixels |
| layout | standard, box_count, button_count, button | the layout |
| share | true, false | whether to show share button too |
WSI comments shortcode parameters
Example: [wp_social_integration_comments] or [wp_social_integration_comments width="500" numposts="5" colorscheme="light" ]
| Parameter | Options | Detail |
|---|---|---|
| numposts | numbers | number of comments to show |
| width | numbers | the width in pixels |
| colorscheme | light, dark | color scheme |
WSI share button shortcode parameters
Example: [wp_social_integration_share_button] or [wp_social_integration_share_button width="100" layout="button"]
| Parameter | Options | Detail |
|---|---|---|
| href | text | any url that will be shared, default is current url |
| layout | button, box_count, button_count, icon_link | layout |
| width | numbers | the width in pixels |
WSI follow button shortcode parameters
Example: [wp_social_integration_follow_button] or [wp_social_integration_follow_button href="https://www.facebook.com/zuck" width="200" colorscheme="light" layout="standard"]
| Parameter | Options | Detail |
|---|---|---|
| href | text | any profile url that will be followed |
| layout | standard, button, box_count, button_count | layout |
| width | numbers | the width in pixels |
| colorscheme | light, dark | colorscheme |
WSI embed post shortcode parameters
Example: [wp_social_integration_embed_fbpost] or [wp_social_integration_embed_fbpost href="https://www.facebook.com/FacebookDevelopers/posts/10151471074398553" width="500"]
| Parameter | Options | Detail |
|---|---|---|
| href | text | any public post url that will be shown |
| width | numbers | the width in pixels(between 350 and 750) |
WSI Send button shortcode parameters
Example: [wp_social_integration_send_button] or [wp_social_integration_send_button href="https://developers.facebook.com/docs/plugins/" colorscheme="light"]
| Parameter | Options | Detail |
|---|---|---|
| href | text | the url that will be send, default is current |
| width | numbers | the width in pixels |
| colorscheme | light, dark | colorscheme |
-----------------------------------------------------------------------------------------------------------------------------
How to create facebook application
If you have not created facebook apps before or have not registerd as a developer then follow from step-1 below Else
if you created apps or registered as developer before then start from step-3 -
step-1: go to this link - https://developers.facebook.com/apps
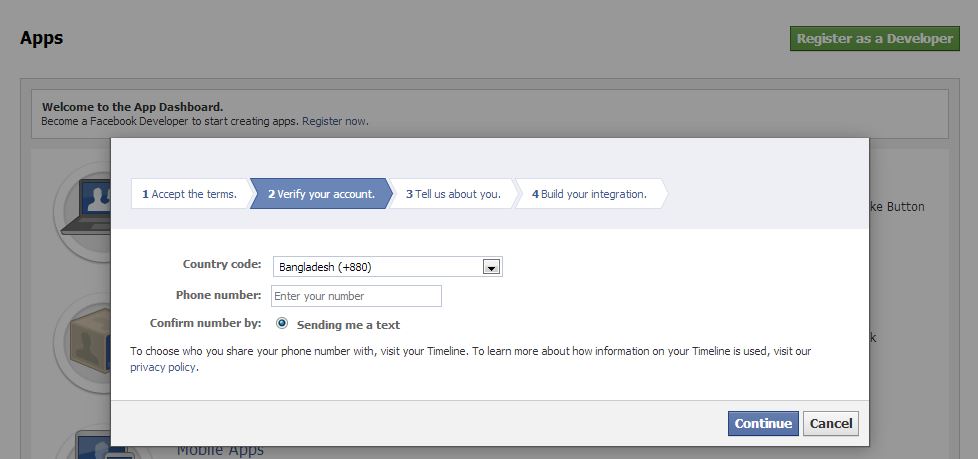
step-2: click "Register as a Developer"/"Register now" button.A popup will
appear as shown below.There check the policy acceptance check box and
click continue.
In the next step you will be prompted to verify your account by entering mobile phone number, following image shows that -

enter your mobile number and verify and clicking continue buttons complete rest of the steps by entering compulsory inputs.
step-3: If you completed step-2, you will see a "developer" section there at left side in home page of your facebook account.
click developer link or https://developers.facebook.com/apps to go to your apps page.
there you will be seeing your created apps listed,
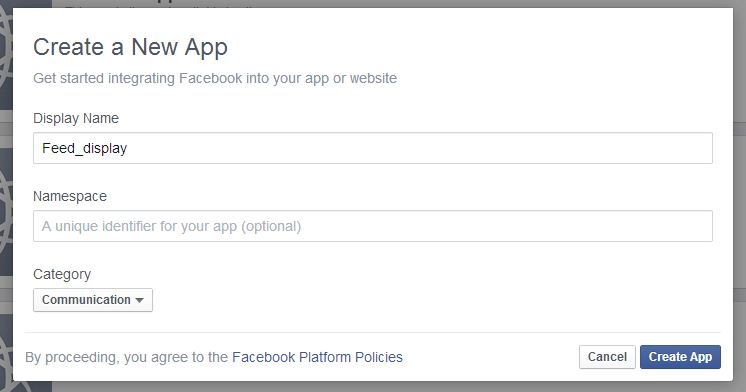
click 'Create a new app' button which is located under "Apps" menu item dropdown (Apps->Create a New App), following window will appear -

Enter display name(app name) and category only and leave other fields blank, then
click "create app".Next you will be prompted to enter captcha as
security check and if you complete this, your app creation is complete
and you will see that application's dashboard page as shown below.
this page also reachable from your account's home page under developer
section by clicking on that app.
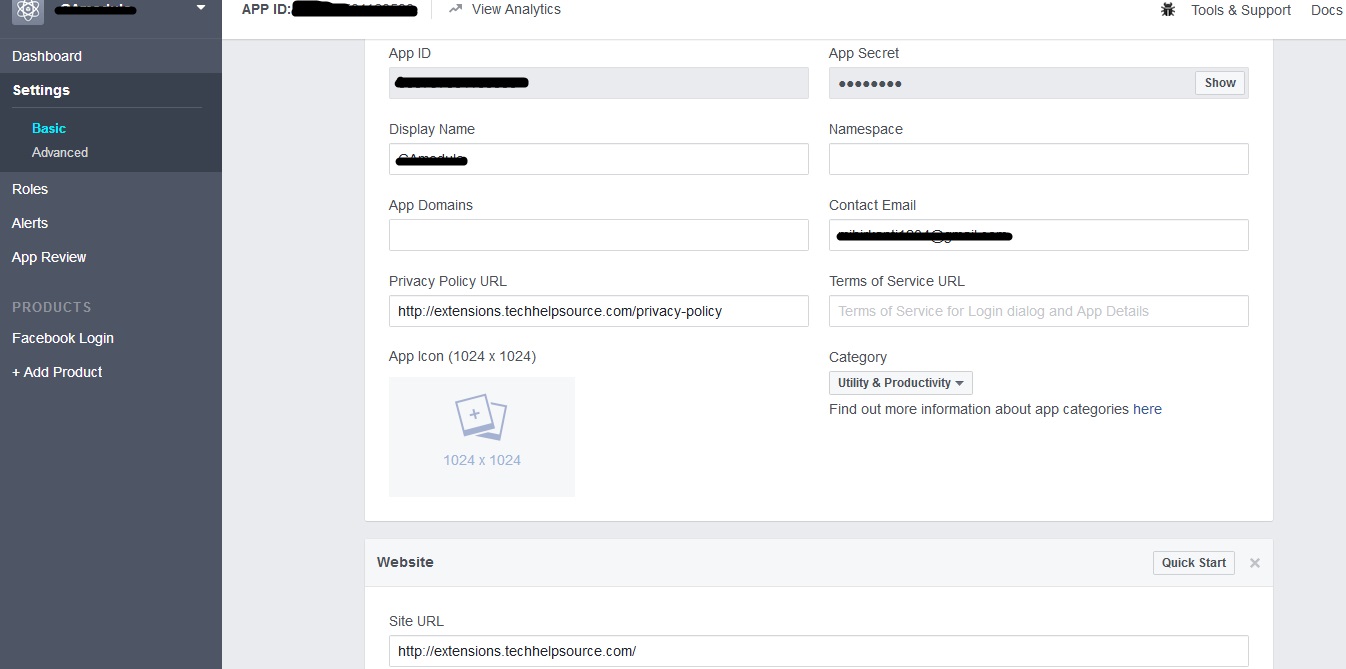
Now you have to do the real part.Click "settings" from app's left hand menu to go it's settings page, there in basic settings tab, click
"+ Add Platform" button at bottom and a pop up window comes up where a lot of platforms listed.Click "Website" in that popup then a website section will be added
as shown in the final picture below.After that in that section enter the site url in "Site URL" field from where you will generate access token.In that
case it will be my token generation site.So enter that address - http://extensions.techhelpsource.com/ and click "save changes" at bottom to save changes for your app.

Finally, you need to make your app live so that it is accessible from anywhere to make feed display work.To do that click "Status & Review" link from left
hand menu of the app.After that chose "Yes" option for the field says - "Do you want to make this app and all its live features available to the general public?"
then confirm to make your app live and public.
That completes applicaton creation and configuring.
for more help email at - mridulcs2012@gmail.com, mridulcs@yahoo.com or use contact page of extension website
for chat skype/yahoo messanger id - mridulcs